故城瞎折腾系列第四期【都4024年了,你的uniapp应用还在手写接口请求吗】
1. 背景
- 刚入行时,我们的接口文档基本上都是txt、wps、postman手写,但是其实后端也不愿意写,更不愿意测,接口文档也不会和代码同步
- 后来出来了各种 api 规范,比较出名的就是 swagger/openapi 规范了,后端按这些规范实现代码注解就可以生成接口文档,还有接口配置,但是注解有时候忘记更新,因为写注解也是一种额外开销,但是想想可以方便后端自己测试、测试人员测试、前端人员测试,后端咬咬牙也就坚持下来了
- 可能写注解确实也是一种额外开销,也容易和代码不同步,所以有没有一种直接解析代码,生成接口文档、接口配置的工具呢,apifox + apifox-ide插件或许是这一块做的稍微好点的了吗?
- 其他的我们就不啰嗦了,前端是否可以利用接口配置生成各种请求 clent 代码呢,这无疑是可以的,但是很多人都没有这个概念,就连一些出名的开源应用都是手写client,如果是自动生成 + 结合ts提示,可以省去很多维护client的精力,这对前端同学无疑是更友好的,而且后端偷偷改接口也很容易轻易发现
2. 导语
- 此篇文章普及如果避免手写请求client,当然这不是没有代价的,需要后端同学支持^_^
- 如果你司正在使用 apifox/swagger/openapi 文档规范技术,似乎你生成请求 client 将是非常容易的事情
- 以下将以 apifox/swagger/openapi 文档讲解如何生成请求client
- 使用 openapi-ts-request 生成请求client
以下是我的【故城瞎折腾系列】文章
第一篇:故城瞎折腾系列第一期【你要不要动手封装个前端Docker容器玩一玩】
第二篇:故城瞎折腾系列第二期【都2024年了,你还在手动部署前端项目吗】
第三篇:故城瞎折腾系列第三期【你看我这样用Nginx部署前端Docker项目,姿势对不对】
第四篇:故城瞎折腾系列第四期【都4024年了,你的uniapp应用还在手写接口请求吗】
3. 已有 Swagger/Openapi 接口文档,生成请求client
- 打开 swagger/openapi 官方文档,这里以 swagger 官方的demo文档为例子
- 你会在界面上清晰的看到文档引用的接口配置文件是 petstore.swagger.io/v2/swagger.json
- 这个文件如果你采用了 swagger/openapi 技术的话,后端执行命令就会默认生成接口配置文件,比较出名的是 java 的knife4j,golang的swag
- 使用 openapi-ts-request 生成请求client、ts、枚举、字段英译汉等等
- 以下演示如何利用 petstore.swagger.io/v2/swagger.json 接口配置来生成请求client,默认是使用 axios 客户端
在前端项目根目录新建 openapi-ts-request.config.ts 文件,然后加入以下代码:
1
2
3
4
5
6
7
import type { GenerateServiceProps } from 'openapi-ts-request';

export default [
  {
    schemaPath: 'https://petstore.swagger.io/v2/swagger.json',
  },
] as GenerateServiceProps[];
在 package.json 文件的 script 中添加命令: "openapi": "openapi-ts"
生成结果:
1
npm run openapi
如果我们想在 uniapp 中使用,那么肯定不能用 axios 客户端, 可以用 @uni-helper/axios-adapter 来适配 uni.request 请求
- 下载
@uni-helper/axios-adapternpm包 - 修改
openapi-ts-request.config.ts文件为如下代码
1
2
3
4
5
6
7
8
9
10
import type { GenerateServiceProps } from 'openapi-ts-request';

export default [
  {
    schemaPath: 'https://petstore.swagger.io/v2/swagger.json',
    requestImportStatement: `import request from 'axios';\n
import { createUniAppAxiosAdapter } from '@uni-helper/axios-adapter';\n
request.defaults.adapter = createUniAppAxiosAdapter();`,
  },
] as GenerateServiceProps[];
正常情况我们都需要对 axios 进行封装,例如增加拦截器处理添加Token,亦或是处理请求错误的情况,所以我们需要封装自己的 request 方法,用 openapi-ts-request 当然可以方便的支持,过程如下:
- 封装自己的自定义 axios 函数,假如 request 函数路径在
src/core/request/index.ts目录,并且设置了 alias 别名 - 修改
openapi-ts-request.config.ts文件为如下代码
1
2
3
4
5
6
7
8
import type { GenerateServiceProps } from 'openapi-ts-request';

export default [
  {
    schemaPath: 'https://petstore.swagger.io/v2/swagger.json',
    requestLibPath: '@/core/request',
  },
] as GenerateServiceProps[];
axios 简单封装,参考如下代码:
1
2
3
4
5
6
7
8
9
10
11
12
13
14
15
16
17
18
19
20
21
22
23
24
25
26
27
28
29
30
31
32
33
34
35
36
37
38
39
40
41
42
43
44
45
46
47
48
49
50
51
52
53
54
55
56
57
58
59
60
61
62
63
64
import { notification } from 'antd';
import axios, { AxiosRequestConfig } from 'axios';

import {
  ILoginInfoStorageState,
  defaultLoginInfoStorage,
  loginInfoStorageKey,
} from '@/store';

const BASE_URL = 'https://localhost:port';

const instance = axios.create({
  baseURL: BASE_URL,
  headers: {
    'Content-Type': 'application/json',
  },
  timeout: 120000, // 超时时间120秒
});

instance.interceptors.response.use(
  (response) => {
    // data解构
    if (response.data) {
      return response.data;
    }
    return response;
  },
  (error) => {
    // 统一错误处理
    if (error.response.status >= 300) {
      notification.error({
        message: error.response.data?.msg,
        duration: 2,
      });
    }
    return Promise.reject(error);
  }
);

instance.interceptors.request.use((config) => {
  const loginInfoStorageStr =
    globalThis.localStorage.getItem(loginInfoStorageKey);
  const loginInfoStorage = loginInfoStorageStr
    ? (JSON.parse(loginInfoStorageStr) as ILoginInfoStorageState)
    : defaultLoginInfoStorage;

  if (loginInfoStorage.state.loginInfo) {
    config.headers.Authorization = loginInfoStorage.state.loginInfo.accessToken;
  }

  return config;
});

const request = async <T = unknown>(
  url: string,
  options: AxiosRequestConfig = {}
) => {
  return await instance.request<T, T>({
    url,
    ...options,
  });
};

export default request;
自定义 uniapp.request 封装,参考以下代码:
1
2
3
4
5
6
7
8
9
10
11
12
13
14
15
16
17
18
19
20
21
22
23
24
25
26
27
28
29
30
31
32
33
34
35
36
37
38
39
40
41
42
43
44
45
46
47
48
49
50
export default async function request(url, options = {}) {
  return new Promise((resolve, reject) => {
    const {
      method = 'GET',
      headers = {},
      data = {},
      timeout,
      responseType = 'json',
      withCredentials,
      ...otherOptions
    } = options;

    uni.request({
      url,
      method,
      header: headers,
      data,
      timeout,
      dataType: responseType === 'json' ? 'json' : 'text',
      withCredentials, // 用于跨域请求时是否携带凭证
      ...otherOptions,
      success: (res) => {
        // 构造符合 Axios 的响应对象
        const response = {
          data: res.data,
          status: res.statusCode,
          statusText: res.errMsg,
          headers: res.header,
          config: options,
          request: res
        };
        // 根据 HTTP 状态码判断请求是否成功
        if (res.statusCode >= 200 && res.statusCode < 300) {
          resolve(response);
        } else {
          reject(response);
        }
      },
      fail: (error) => {
        // 构造符合 Axios 错误格式的对象
        const err = {
          message: error.errMsg || 'Request failed',
          config: options,
          request: error
        };
        reject(err);
      }
    });
  });
}
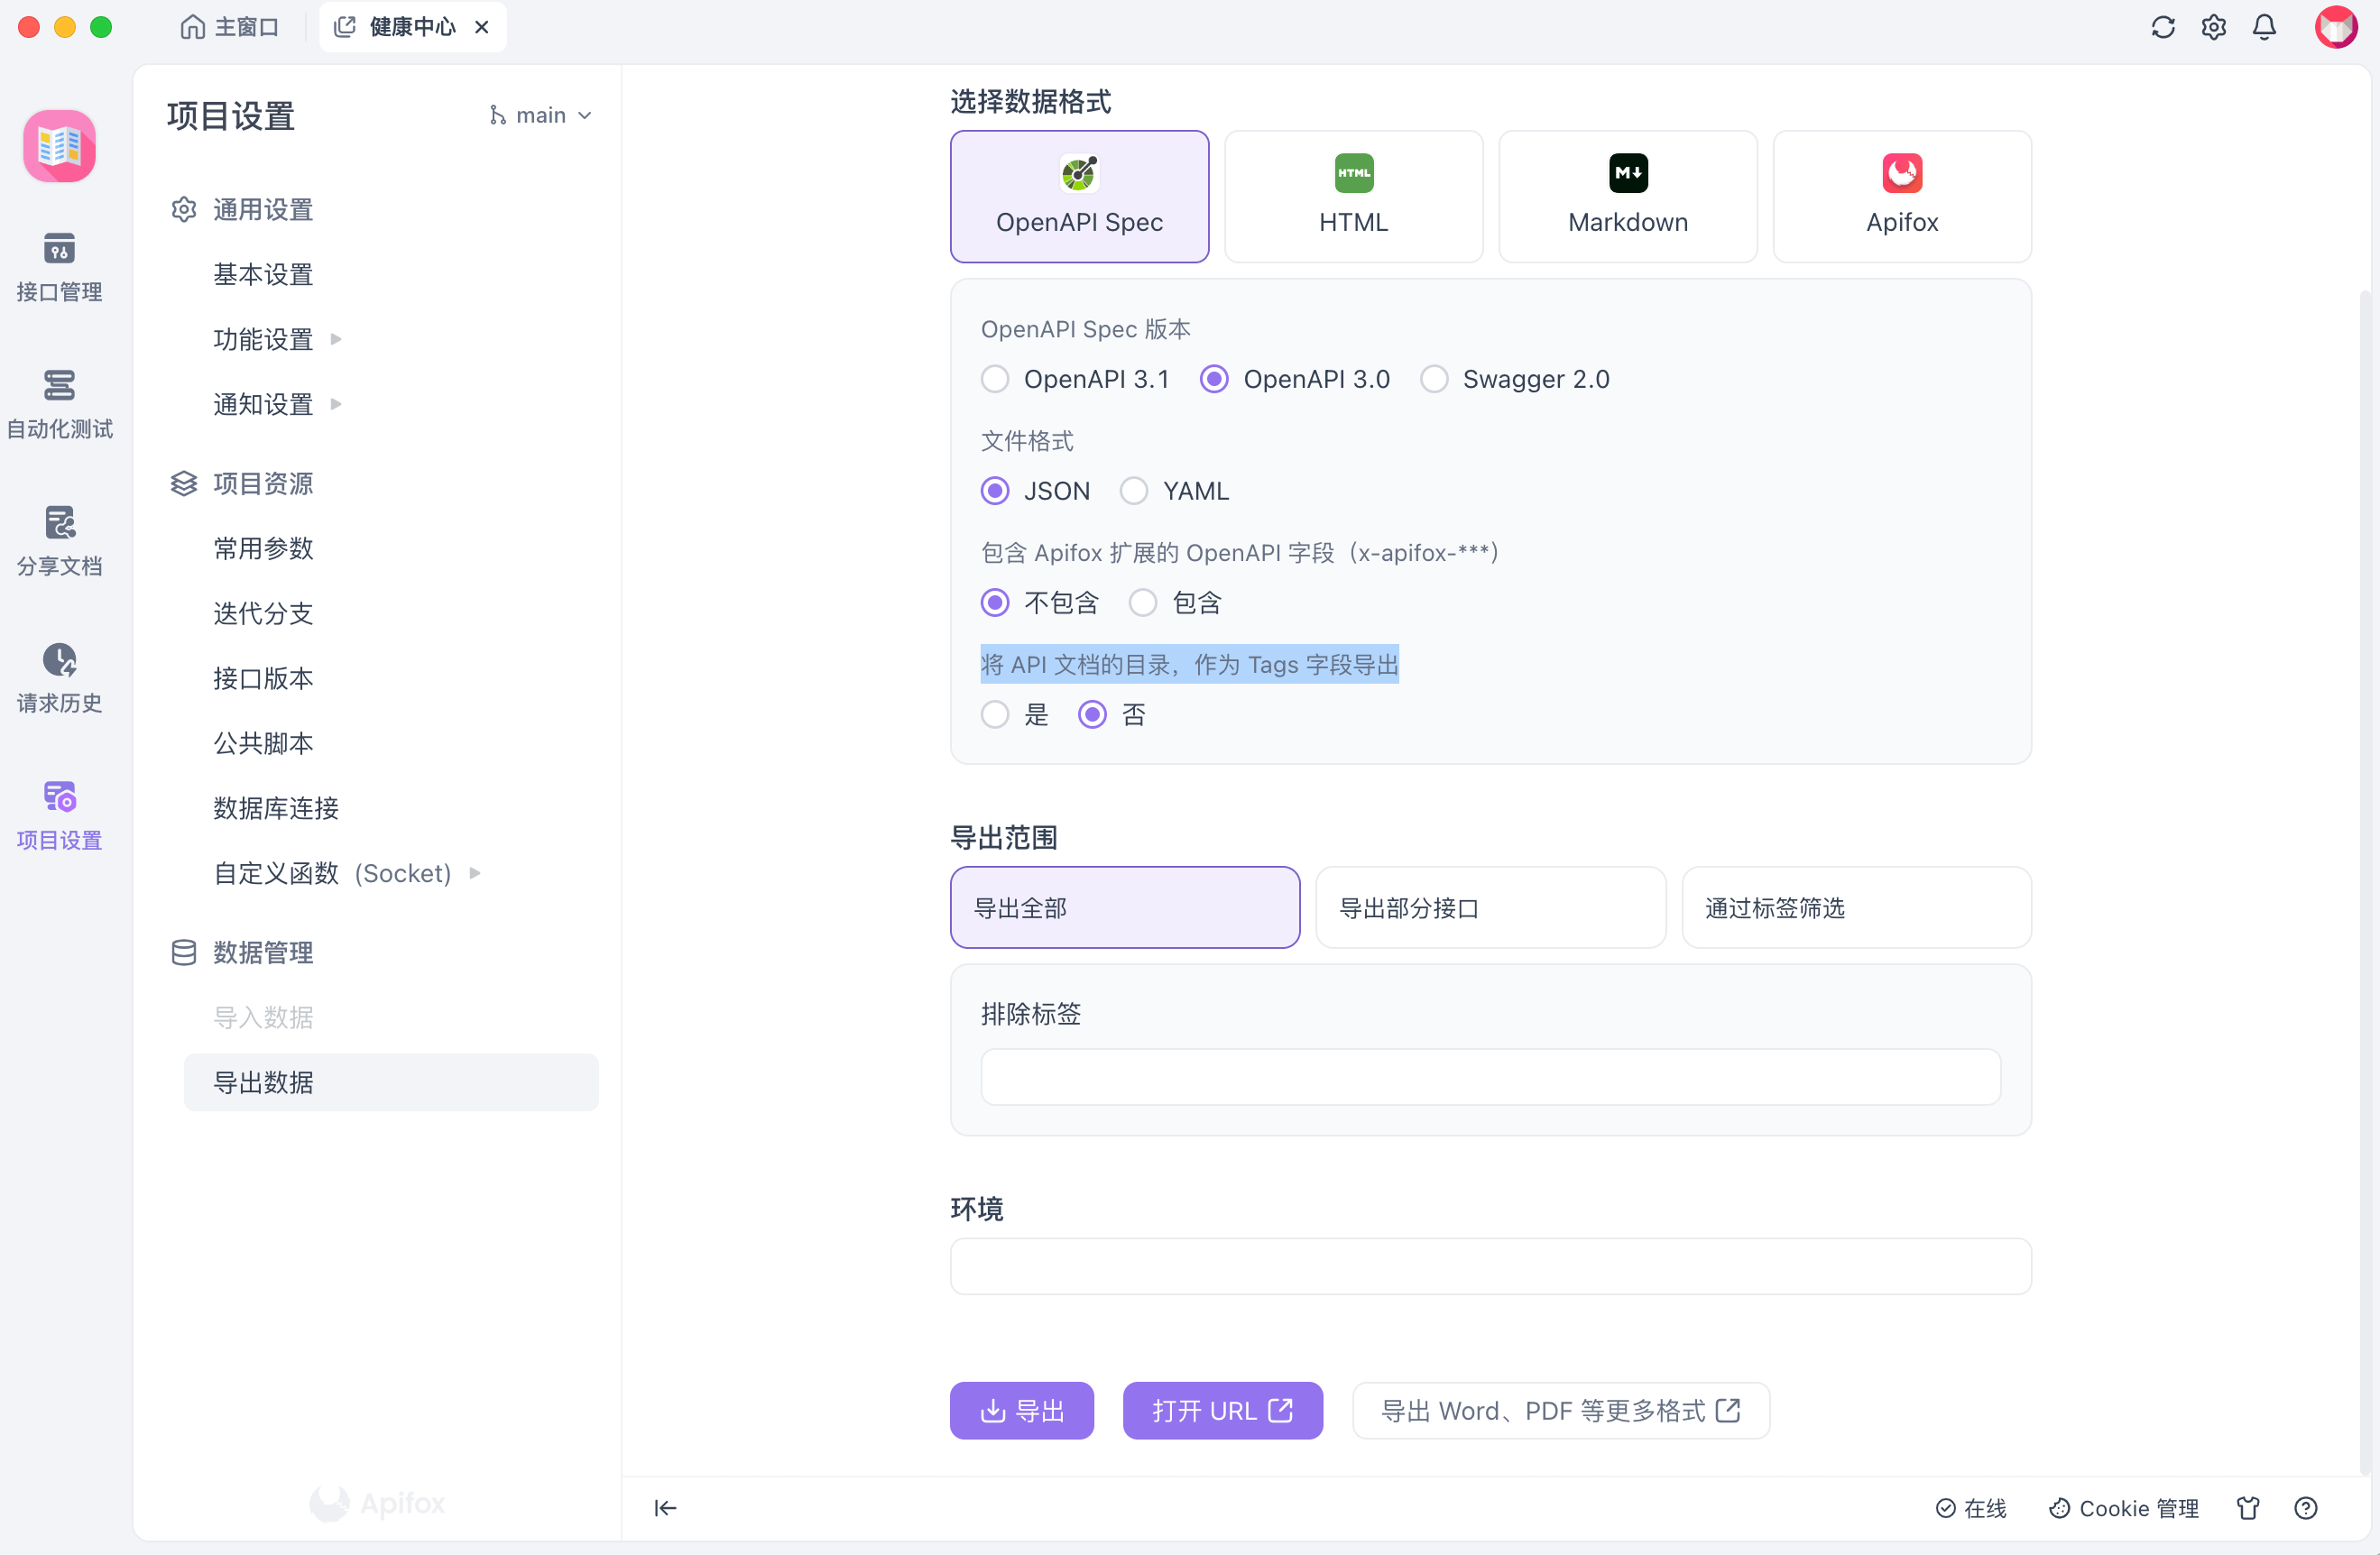
4. 已有 Apifox 接口文档,生成请求client
Apifox文档,作者暂时还没找到接口配置文件,按理说不应该啊,难道只能使用 Apifox 桌面端的手动导出接口文档功能吗?有没有知道的小伙伴评论区告知一下?
- 打开 Apifox 桌面客户端
- 选择需要查阅 API 文档的服务,点击进入
- 点击服务左侧工具栏目中的
项目设置 - 点击
导出数据 - 选择 OpenAPI Spec 版本:
OpenAPI3.0,文件格式:JSON,包含 Apifox 扩展的 OpenAPI 字段(x-apifox-***):不包含,将 API 文档的目录,作为 Tags 字段导出:否 - 点击
打开URL按钮,会生成临时的接口文档链接:http://127.0.0.1:4523/export/openapi/2?version=3.0 - 修改
openapi-ts-request.config.ts文件为下面的代码
1
2
3
4
5
6
7
8
import type { GenerateServiceProps } from 'openapi-ts-request';

export default [
  {
    schemaPath: 'http://127.0.0.1:4523/export/openapi/2?version=3.0',
    requestLibPath: '@/core/request',
  },
] as GenerateServiceProps[];
5. 结语
- 介绍了如何利用已有的 Swagger/Openapi 接口文档,生成请求client
- 介绍了如何利用已有的 Apifox 接口文档,生成请求client
- 介绍了使用 openapi-ts-request 生成请求client
- 介绍了如何自定义 request 函数,基于 axios 实现封装
- 介绍了如何自定义 request 函数,基于 uni.request 实现封装
- 看都看完了,还不动手操作一波
本文由作者按照 CC BY 4.0 进行授权